根据 URL 加载 glTF 模型
Model 类的方法 - addGltf
方法介绍
UniCore 内置 Model 类,提供 addGltf 方法用于加载 glTF 模型文件。
该方法需传入两个对象,一组为经度、维度、高度组成的对象,一组为属性组成的对象。
结构类似下面代码块:
js
  function addGltf ({
    lon = 0,
    lat = 0,
    height = 0
  }, {
    id,
    name,
    url,
    scale = 1,
    property = null,
    rotate = [0, 0, 0]
  })
变量的JSDoc形式如下:
js
 /**
  * 增加GLTF模型
  * @param {*} param0 经纬高程
  * @param {*} param1 属性
  * @returns
  */
你可以通过加入 模型加载进度条组件 提升用户体验。
不妨通过代码示例在 Vue 中尝试一下(相关模型文件在本章 阅前提醒 中的内网Git链接中可获取):
在线演示
点击 在线链接 以查看在线演示。
代码示例
vue
<template>
<div id="unicoreContainer"></div>
</template>
<script>
import { UniCore } from 'unicore-sdk'
import { config } from 'unicore-sdk/unicore.config'
import 'unicore-sdk/Widgets/widgets.css'
export default {
// 生命周期 - 挂载完成(可以访问DOM元素)
mounted () {
this.init();
},
// 方法集合
methods: {
/**
* 通用图形引擎初始化
*/
init () {
// 初始化UniCore
// 目前采用Cesium的地形&底图数据,这里配置Cesium的token
let accessToken = "eyJhbGciOiJIUzI1NiIsInR5cCI6IkpXVCJ9.eyJqdGkiOiIxNjEwMzI4My01MjBmLTQzYzktOGZiMS0wMDRhZjE0N2IyMGIiLCJpZCI6MTc1NzkyLCJpYXQiOjE3MTM3NzQ3OTh9.zU-R4MNvHr8rvn1v28PQfDImyutnpPF2lmEgGeSPckQ";
// 初始化unicore
let uniCore = new UniCore(config, accessToken);
uniCore.init("unicoreContainer");
// 视角初始化
uniCore.position.buildingPosition(uniCore.viewer, [113.12380548015745, 28.250758831850005, 700], -20, -45, 1);
uniCore.model.addGltf({
lon: 0,
lat: 0,
height: 0
}, {
id: "城市白膜",
name: null,
url: '../../../assets/gltf/长沙项目项目周边模型.glb',
scale: 6.8,
property: null
}).then(cityModel => {
uniCore.model.changeModelPos(cityModel, [113.12098820449636, 28.256150218457687, 50], [90, 0, 0])
})
}
}
}
</script>
<style scoped>
#unicoreContainer {
position: absolute;
top: 0;
left: 0;
width: 100%;
height: 100%;
overflow: hidden;
background: black;
}
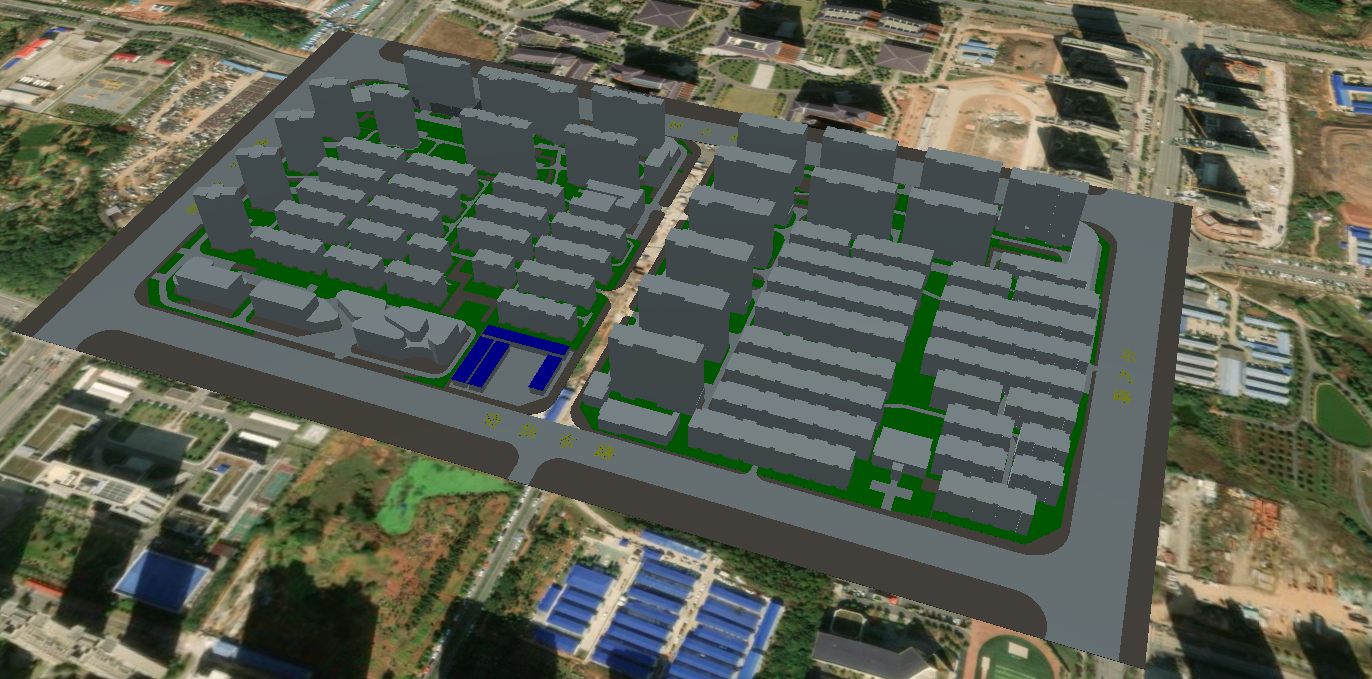
</style>示例运行结果
关键代码
你可以通过修改 buildingPosition 中的变量查看修改这些变量带来的效果。
js
uniCore.model.addGltf({
        lon: 0,
        lat: 0,
        height: 0
  }, {
    id: "城市白膜",
    name: null,
    url: '../../../assets/gltf/长沙项目项目周边模型.glb',
    scale: 6.8,
    property: null
  }).then(cityModel => {
    uniCore.model.changeModelPos(cityModel, [113.12098820449636, 28.256150218457687, 50], [90, 0, 0])
  })
通过阴影增强模型质感
推荐你使用阴影增强模型质感,你可以将以下代码拷贝运行,根据情况调整参数:
js
let viewer = window.viewer;
viewer.shadows = true;
viewer.scene.shadowMap.maximumDistance = 5000; // 扩大阴影投射范围
viewer.scene.shadowMap.softShadows = true;     // 启用柔和阴影
viewer.shadowMap.darkness = 0.8;  // 0.0纯黑 → 1.0无阴影
viewer.shadowMap.color = new Cesium.Color(0.1, 0.1, 0.1, 0.8); // RGB+透明度
viewer.shadowMap.softShadows = true;
viewer.shadowMap.size = 4096;     // 阴影贴图分辨率提升
viewer.shadowMap.numShadowCascades = 4; // 级联阴影层级
viewer.shadowMap.cascadeSplitDistance = [0.1, 0.2, 0.5, 1.0];
viewer.shadowMap.fadeOverlap = 0.3; // 级间过渡平滑度
viewer.scene.skyAtmosphere.luminanceAtZenith = 2.0; // 天顶亮度增强
改变模型着色器(如亮度)
通过将关键代码中的加载 glTF 部分修改为以下代码,即可利用回调函数改变模型着色器(如亮度)。调整代码中的 material.diffuse * (1.0) 的 1.0 数值可调整模型亮度。你也可以尝试使用更多不同的着色器代码修改模型显示效果。
js
uniCore.model.addGltf({
    lon: 0,
    lat: 0,
    height: 0
  }, {
    id: id,
    name: null,
    url: url,
    scale: 1,
    property: null
}).then(cityModel => {
    // 着色器代码
    let customShader = new Cesium.CustomShader({
      // lightingModel: Cesium.LightingModel.UNLIT,
      lightingModel: Cesium.LightingModel.PBR,

      //片元着色器
      fragmentShaderText: `
    void fragmentMain(FragmentInput fsInput, inout czm_modelMaterial material) {
      vec3 positionMC = fsInput.attributes.positionMC;
      //此处以下为光线效果
      material.diffuse += material.diffuse * (3.0);
    }`
    })

    // 插入着色器代码
    cityModel.customShader = customShader
})
可能存在的模型过白或一团黑的问题
这是因为当前渲染模式为 UNLIT 模式,需要改为 PBR 模式。并且需要注意的是,新版本的 Unicore 引擎可能存在适配 BUG ,需要降级版本,目前已知 1.5.1 版本是可行的。
修改模型的 PBR 模式见本章的 改变模型着色器(如亮度) 关于 lightingModel 的修改。